Posts

Segment Timer 1.4 update


alan2

Click here to see more about my services

I was going to make a minor note about the small change I made to version 1.3 here, but then today decided that another web app I made for tracking issues during a live production should be rolled into this one too so that they can both be run on the same Pi and controlled with the same controller.

Click here to download version 1.4

Version 1.4
– NEW – Added the ability to record issues that need to be addressed in post-production.
– NEW – Colors are red for talent mistakes, blue for production mistakes and yellow for misc mistakes.
– NEW – Default keys are Q for talent mistakes, W for production mistakes and E for misc mistakes.
– NEW – The R key will blank out any error recording placed, either to dismiss it entirely or so that the recorded segments show up again.
    – NEW – Color block shows up for 20 seconds so that it’s very clear in a typical Final Cut timeline, then remains as a coloured border for a further 10 seconds.
    – NEW – Text added to each colour to destinguish between Talent, Production and Misc. mistakes to be edited out.
    – NEW – Text starts black then fades away with the block.
Version 1.3
– CHANGE – set a larger line height and font size for the recorded segments, to make them easier to read on a multiview.
Version 1.2
– CHANGE – Changed the recordedSegments Div to a flexbox and set it to record the contents left to right.
– NEW – Removed the placeholder segments and now create the sections automatically when needed.
– NEW – Can have over 100 recorded segments now and the view will scroll automatically to accommodate them.
– NEW – If you have a mouse connected this area can be scrolled while in use.
– CHANGE – Changed the recorded segments to have an ‘-‘ between the segment length and ended time.
– CHANGE – When recording segments it now creates a red box and white text, then goes back to the grey text on black after 5 seconds.
– FIXED – The colour changing animation no longer gets stuck when recording segments.
– CHANGE – when the segment timer and event timer change red, they had a slight glow to them.
Version 1.1
– CHANGE – Updated the behaviour of the K key to make sure that the final segment of the show is also recorded.
– CHANGE – Removed commented out code that I have no intention of returning to.
– CHANGE – Corrected some minor typos in the code.
– CHANGE – changed the movie camera emoji to the video camera emoji as the first one doesn’t display on the Raspberry Pi.
Known Bugs:
– Resetting the Segment Timer doesn’t affect the Event Timer, which is by design. but this does sometimes lead to recorded segments looking like they are missing a second simply because the two counters are’t ‘in-sync’. If we recorded milliseconds it likely wouldn’t be an issue
– Recording a segment within the first second of an event will work, but as the length is too small it won’t be recorded. Segment 2 will then be saved in the segment 1 spot and so on.

If you still need version 1.1 – Click Here to download.
If you still need version 1.2 – Click Here to download.

Previous
Next

Take a look at what I can do…

LIVE VIDEO PRODUCTION

VIDEO EDITING

POSTERS

MERCH

GRAPHIC DESIGN

WEB DESIGN

Segment Timer 1.2 update


alan2

Click here to see more about my services

I’ve re-written a significant portion of the segment timer and updated it’s functionality. Click Here to download version 1.2

Version 1.2
– CHANGE – Changed the recordedSegments Div to a flexbox and set it to record the contents left to right.
– NEW – Removed the placeholder segments and now create the sections automatically when needed
– NEW – Can have over 100 recorded segments now and the view will scroll automatically to accommodate them.
– NEW – If you have a mouse connected this area can be scrolled while in use
– CHANGE – Changed the recorded segments to have an ‘-‘ between the segment length and ended time.
– CHANGE – When recording segments it now creates a red box and white text, then goes back to the grey text on black after 5 seconds.
– FIXED – The colour changing animation no longer gets stuck when recording segments.
– CHANGE – when the segment timer and event timer change red, they had a slight glow to them

If you still need version 1.1 – Click Here to download.

Previous
Next

Take a look at what I can do…

LIVE VIDEO PRODUCTION

VIDEO EDITING

POSTERS

MERCH

GRAPHIC DESIGN

WEB DESIGN

Raspberry Pi Timer using HTML, Javascript and Kiosk Mode


alan2

Click here to see more about my services

In my previous post, I talked about setting up a Raspberry Pi to work as a video layout machine, looping a video with optional control with a USB controller. I noted that I had used the controller to restart the video – this was because I had planned to have a simple counter counting up that could be fed into a multi view for timing segments of a show, and this would also go into an ISO recording if you were so inclined.

Since this is a useful use case, I figured I’d look into making it even more useful by adding the current time and date to the display. Obviously, we can’t use a video for this, so we will re-create the functionality using a web browser on the Pi set to kiosk mode running a couple of javascript pages that will again react to our USB controller.

As before, if this were to be a delivered product to a client, we would want to instead get some buttons that we can wire up to the GPIO.

This is assuming a basic Raspberry Pi build. I started with a fresh install of Raspian OS Full 32bit. I booted up, disabled bluetooth and set up wifi. I also made sure that my display settings were set to 1080p60.
Once the software is all installed, you can set up ssh for changing the video source out but I’d strongly suggest disabling wifi before taking it to an event. If you’re installing at a client location you might want to research code to lock down the ethernet too, and change the login password.

Install all software:

Use Terminal to apt-get with the following commands :

sudo apt-get install update

sudo pip3 install pynput

sudo apt-get install qjoypad

sudo apt install chromium-browser -y

sudo apt-get install --no-install-recommends xserver-xorg x11-xserver-utils xinit

sudo apt-get install chromium x11-xserver-utils unclutter

Open and set the buttons for qjoypad.

This may take some trial and error. Open the app from the main menu – Games section. Save the profile as ‘kiosk’
I set one button to be the key ‘n’ which I will use to reset my timer. The second button I set as ‘esc’ and will be used to shutdown the Pi safely. I close this key as I don’t need to use it if I need to log on and make changes to the set up in the future, and if I need the esc key I can turn off the script ahead of time.

You may want to set another button to operate as Alt+F4, as this is the key command to exit kiosk mode on chromium. I didn’t bother, as chances are if I want to make any changes to this I’ll be plugging in a keyboard anyway.

Write python script for shutdowns

In Terminal use :

mkdir /home/pi/scripts

sudo nano /home/pi/scripts/shutdown.py

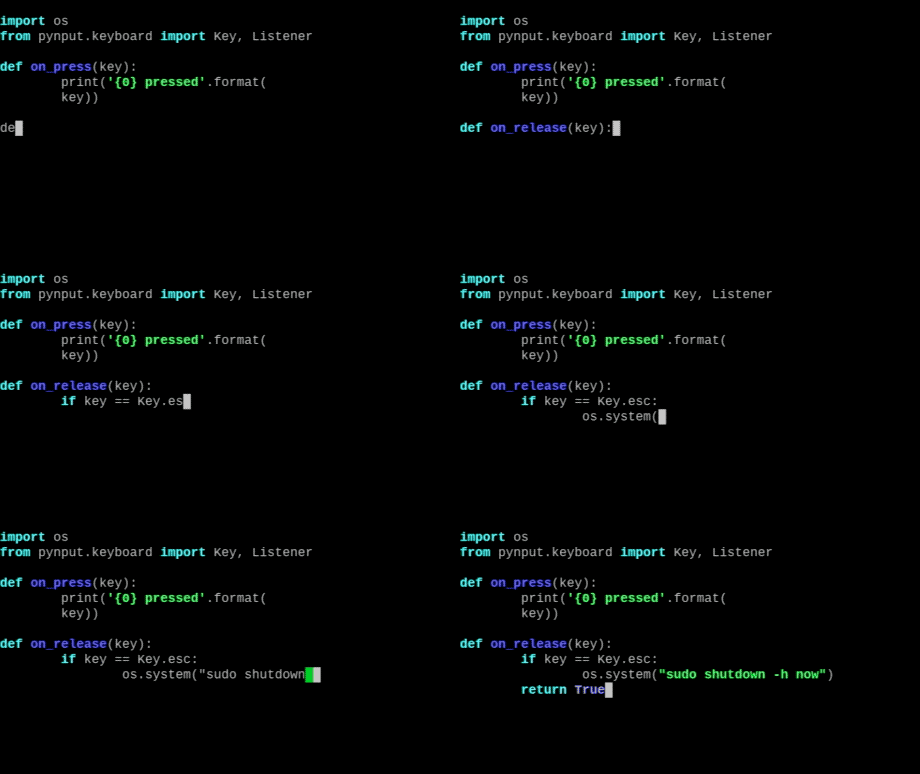
use the following code :

import os
from pynput.keyboard import Key, Listener

def on_press(key):
print('{0} pressed'.format(
key))

def on_release(key):
if key == Key.esc:
os.system("sudo shutdown -h now")
return False

# Collect events until released
with Listener(
on_press=on_press,
on_release=on_release) as listener:
listener.join()

Save by pressing ctrl+x, y, return

Set up our webpage HTML and CSS files

CLICK HERE for the code (version 1.2) for these files. Save them to the desktop. The code here does two things.

1. We have a javascript running that will take the time and date from the host system and display it in a mid-grey color. If this doesn’t show the right time, adjust the clock settings on the Pi.

2. A second javascript is running that will listen for keyboard imputes. The ‘n’ key can be pressed (our controller in this case) and start counting up a light-grey HH:MM:SS counter. Pressing the button again will reset the counter, turning it red for 5 seconds so that it’s clear the change has taken place. 
These timed segments are matches against an overall event timer and recorded at the bottom of the screen.

This script also listens for the K key to end the event. Pressing N on a stopped event will wipe the recorded segments and start over.

The layout of the page is designed to mimic the look of the other BlackMagic ATEM multi view displays, and the colour scheme means that the video bit-rate on an ISO recording won’t be astronomical.

Optional: install fonts

The font’s I used are to closely match the rest of the UI on the ATEM Mini lineup. The font is free for commercial use and included in the file with the HTML and CSS files.

If you want to use them too, you need to open the file manager and navigate to the /home/pi/ folder. Press ctrl+h to show hidden files, then make a new folder called .fonts. The . at the start makes it a hidden folder and it’s what Raspian is looking for when it looks for fonts.

Copy the fonts from the file you downloaded into this folder.

Set the script, video and qjoypad to run at boot

In Terminal again, use :

sudo nano /etc/xdg/lxsession/LXDE-pi/autostart

At the bottom add :

/usr/bin/chromium --kiosk --disable-restore-session-state /home/pi/Desktop/index.html
@unclutter -idle 0.1 -root
@qjoypad kiosk
@sudo python3 /home/pi/scripts/shutdown.py

Save by pressing ctrl+x, y, return

Our end result: A small and cheap box that when it receives power will boot up, and display a webpage that we have on our desktop. Pressing one button on our controller will start or restart our segment counter, and pressing another button will initiate a safe shutdown of the Pi.

Our magic is all in the code at the end here: we run our python script which is constantly checking for the ‘esc’ key which will initiate a safe shutdown. qjoypad is listening for button presses on the controller and translating them to keyboard presses. And Chromium is loading into kiosk mode which is full screen and eliminates things such as the url bar and window dressing. The final key to this is unclutter, which hides the mouse when it’s not moving.

There are several other uses for something like this of course. If you have wifi access for the Pi on location you could be pulling up a google doc that team members are updating though out an event, for example.


Previous
Next

Take a look at what I can do…

LIVE VIDEO PRODUCTION

VIDEO EDITING

POSTERS

MERCH

GRAPHIC DESIGN

WEB DESIGN

Raspberry Pi Video Playout


alan2

Click here to see more about my services

Many shows, events or set-ups benefit from having a video playing out on a rotation. The basics here are fairly simple and a Raspberry Pi 3 is a cheap way to build something basic. Uses could include a video menu rotating options, showing video clips or photos at a wedding, running an animated logo on screen at an event, etc.

Note that if this is for a gear bag or case, you can get away with a bare board and USB controller. If it’s a client installation you might want to consider a nice case and building a button to the GPIO – for the example here you’d need to modify the code and you can skip the qjoypad section. If you wire to the GPIO your button should connect to pins 5 and 6 for shutdown.

Along with playing a video on repeat, I use a USB game controller to allow me a little control. My main use here is to have a video with a count up that I can press a button to re-set. This can be used to time any part of your show, and the multi-view is a great place to display it, but it’s not hard to use this set up to have a little more control over the video. See the end of the post for more info on that.

This is assuming a basic Raspberry Pi build. I started with a fresh install of Raspian OS Full 32bit. I booted up, disabled bluetooth and set up wifi. I also made sure that my display settings were set to 1080p60. (may not be needed for you, but I had to also edit /etc/resolv.conf and add a google name server 8.8.8.8 as the one for my router doesn’t play nice with the Pi)

Once the software is all installed, you can set up ssh for changing the video source out but I’d strongly suggest disabling wifi before taking it to an event. If you’re installing at a client location you might want to research code to lock down the ethernet too, and change the login password.

Install all software:

Use Terminal to apt-get with the following commands :

sudo pip3 install pynput

sudo apt-get install qjoypad

Open and set the buttons for qjoypad.

This may take some trial and error. Open the app from the main menu – Games section. Save the profile as ‘video’
I set one button to be the key ‘n’ as this advances a video on VLC to next. The second button I set as ‘esc’ and will be used to shutdown the Pi safely. I close this key as I don’t need to use it if I need to log on and make changes to the set up in the future, and if I need the esc key I can turn off the script ahead of time. The esc key is used by VLC to exit fullscreen and isn’t something we need to do in normal operation.

Write python script for shutdowns

In Terminal use :

mkdir /home/pi/scripts

sudo nano /home/pi/scripts/shutdown.py

use the following code :

import os
from pynput.keyboard import Key, Listener

def on_press(key):
   print('{0} pressed'.format(
   key))

def on_release(key):
   if key == Key.esc:
      os.system("sudo shutdown -h now")
   return True

# Collect events until released
with Listener(
      on_press=on_press,
      on_release=on_release) as listener:
   listener.join()

Save by pressing ctrl+x, y, return

Set the script, video and qjoypad to run at boot

in Terminal still, use :

sudo nano /etc/xdg/lxsession/LXDE-pi/autostart

At the bottom add :

@vlc path_to_video_file --loop --fullscreen
@qjoypad video
@sudo python3 /home/pi/scripts/shutdown.py

Save by pressing ctrl+x, y, return

Our end result: A small and cheap box that when it receives power will boot up, and start playing a video on repeat. Pressing one button on our controller will move to the next video (in this case the same one) and pressing another button will initiate a safe shutdown of the Pi.

Our magic is all in the code at the end here: we run our python script which is constantly checking for the ‘esc’ key which will initiate a safe shutdown. qjoypad is listening for button presses on the controller and translating them to keyboard presses. And VLC starts up on boot. We have set the options to fullscreen and also loop.

Make sure that path_to_video_file is set correct for you – my path is /home/pi/Desktop/Segment.mov

We can do a LOT more with VLC here if we wish. Listing several video files will make a playlist on start with the videos in that order and pressing next will advance to the next one in our playlist. If you have several, you can build a playlist in the VLC GUI and save the playlist file as an mu3 file and reference that on startup also.

Here is a full list of command line arguments you could use. https://wiki.videolan.org/Documentation:Command_line/

MODELLING VIDEOS

FAN VIDEOS

HYPE VIDEOS

HYPE VIDEOS

PROMOTIONAL VIDEOS

PROMOTIONAL VIDEOS

ENTERANCE VIDEOS

ENTERANCE VIDEOS

MUSIC VIDEOS

MUSIC VIDEOS

MODELLING VIDEOS

MODELLING VIDEOS

HIGHLIGHT PACKAGES

HIGHLIGHT VIDEOS

CINEMATIC SHORTS

CINEMATIC VIDEOS

FAMILY VIDEOS

FAMILY VIDEOS

Previous
Next

My name is Alan. I’m based just outside Toronto, Ontario. 

My background is in digital media from video editing, live event production, photo editing and programming. 

I can help with developing all kinds of events, including managing live audio, video and lighting, digital media for promotions and advertising, developing merchandise, building websites and online stores, and even post-production video work.

I offer significant discounts to charities and non-profit groups.

TESTIMONALS – CONTACT ME

Take a look at what I can do…

LIVE VIDEO PRODUCTION

VIDEO EDITING

POSTERS

MERCH

GRAPHIC DESIGN

WEB DESIGN